Showing posts with label TUTORIALS. Show all posts

Monday, June 29, 2009

LAYERED SCALLOP EDGE MEDALLION TUTORIAL

I've received many e-mails asking how to achieve the Layered Scallop Edge Medallion that I've used on some of my cards lately. You're going to be surprised to find that it's quite easy!

First, follow THIS TUTORIAL on SCS by Alesha Walls
which shows how to make a Single Layer Scallop Edge Medallion. The outer Pink Pirouette scallop square on my card pictured measures 2 3/4" square as demonstrated in the tutorial. For the next smaller layer (my Basic Gray layer on my card), cut a 2 5/8" square and do the same punching with the Scallop Edge punch that you did with the 2 3/4" Pink Pirouette square - centering on each edge. The 2 5/8" Basic Gray square is layered on top of the 2 3/4" Pink Pirouette square.

Measurements for this card pictured, starting with the outside layer:
* Basic Gray base - 4 1/4" x 8 1/2", scored at 4 1/4"
* Pink Pirouette - 4" square
* Walk In The Park Designer Paper - 3 3/4" square
* Pink Pirouette Scallop Edge Medallion Layer - 2 3/4" square
* Basic Gray Scallop Edge Medallion Layer - 2 5/8" square
* Basic Gray main image frame - 1 3/4" square
* Whisper White main image - 1 5/8" square


You can see more details about the card pictured HERE (scroll down to bottom of post). Other cards I've made using the Layered Scallop Edge Medallion technique ... So Saffron Flight of the Butterfly and Thanks A Bunch (Layered Scallop Medallion measures Basic Black 2 7/8" square and Certainly Celery 2 3/4" square). The possibilities with layering and square sizes are endless!

Laurie Froehlich, Inspired Designs was the first artist I've seen to use this Layered Scallop Edge Medallion technique, and my cards have been completely inspired by her designs. You will see that she's taken the technique a step further by adding additional layers, cutting off the outer frame, etc. You can see her Layered Scallop Edge creations HERE, HERE, HERE, and HERE.

Saturday, November 15, 2008

PHOTOGRAPHING MY ARTWORK

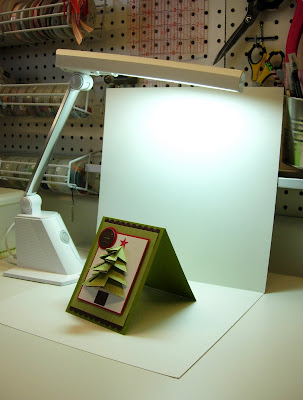
I've had several iSTAMP readers e-mail me lately asking how I photograph my artwork. I'm extremely flattered that they think my photographs are good enough to share my process with others. You will probably laugh when you see the unsophisticated methods I use! There are many stampers/bloggers whose photographs I look at with great envy! What I have learned, I've learned from others ... AND everything I do is a result of alot of experimenting! I have tried the photo cubes and other methods, but this process is what works best for me ...

EQUIPMENT. I do not own a fancy, expensive camera. I use my Nikon Coolpix 5200 point & shoot digital camera.

WHERE. I take most of my photos at my stamping workstation ... see photo below. I wanted to point out a couple of things in this photo. First, the window with the blinds open. I have found that the more natural light I have coming in the room, without it being direct sunlight, the better. I also have fluorescent lighting under the cabinets and an OTT-LITE lamp that provides natural light.
THE BACKDROP. This next photo zooms in closer to show you the unsophisticated "studio" I easily rig up for each photo. I use two white cardboards from Stampin' Up!'s Designer Paper Packs ... one lies flat on my work surface, and the other is used as a backdrop (it just leans against my pegboard.LIGHTING. I try to let as much natural light into the room as possible. The fluorescent lighting under the cabinets provides light on my artwork. My craft room has a ceiling fan & light in the center of the room. For some reason, my photos turn out better with that light off (when shooting the photo, that light would be behind & above me). I position the OTT-LITE (natural light) BEHIND my artwork, a key component. It does not shine toward the artwork, it shines directly down, behind it. I never use a flash on my camera (disaster!).

CAMERA SETTINGS. I use a simple "Point-and-Shoot" mode and the Macro Close-Up option (tulip icon). Again, I never use a flash.

POSITIONING. I rarely photograph my artwork straight on ... I almost always angle the artwork slightly to each side. I also tend to photograph each piece with my camera slightly elevated.

PRACTICE, PRACTICE, PRACTICE. When photographing artwork I take MANY photos of it. It never fails ... I usually think a card will look great photographed from one side better than the other ... and the opposite is usually the case. So, I take many photographs from many different angles to get the best photo. Don't you just love digital for this very reason?!

EDITING. The next step is to choose the one photo from many that I think is best and edit. I use Adobe Photoshop 6.0. First I crop the photo, then play around with the lighting. I always to go ENHANCE, ADJUST LIGHTING, LEVELS. I play around with the Input Levels, and sometimes the Output Levels to get the best lighting. Sometimes, I go to ENHANCE, ADJUST LIGHTING, BRIGHTNESS/CONTRAST and adjust the lighting there too. Again, lots of trial and error.

ADD YOUR MARK. Lastly, I add a watermark as an overlay to the photo, the white lettering that says "designed by Nancy Riley". I think this is such an important step as a designer, as I've seen some artists' photos/artwork used without permission. Get a watermark to protect your beautiful artwork! I've had a couple watermarks designed by Beth Silaika, Freckled and Fun. She has lots of great designs to choose from!

As a final note, I encourage you to experiment, especially with lighting. A photograph should enhance your beautiful artwork and really show it off!

Sunday, November 2, 2008

SCS HOLIDAY TUTORIAL BLITZ

I've been bustin' at the seams to tell you this news! TODAY, I have a featured tutorial on SCS for their Holiday Tutorial Blitz! In fact, it's the Top News of the day on SCS's homepage!

Remember these altered junior legal pads/wish lists I made last Christmas? ... click HERE to see more. Beate Johns asked me to write a tutorial for them for Splitcoast! You can see the tutorial HERE. All week, SCS will be having their Holiday Tutorial Blitz with a new holiday project and tutorial every day.

It was an honor to be asked to write the tutorial, and Beate was such a pleasure to work with! She was very patient with this inexperienced tutorial writer!

The icing on the cake was this gorgeous RAK I received from Beate Johns! Beate used the Stampin' Up! Statement of the Heart stamp, along with the color combination of Pink Pirouette, Kiwi Kiss, and Chocolate Chip and Dazzling Diamonds on the stamped flower image.

Tuesday, December 4, 2007

ALTERED CHRISTMAS WISH LIST TUTORIAL & GIFT IDEA

One evening last week, I whipped up these altered Christmas Wish Lists using jr. legal notepads for my fellow SCS'ers/Bloggers/Stampers/Friends, Nancy Morgan and Fran Sabad. There was a little "ELFing" going on on SCS, and I surprised Nancy and Fran with a bucket of Christmas goodies that included these altered notepads. These notepads were completely inspired by Heather Nichols' Holiday List Book HERE. Nicole's Wish Lists are adorable!!! Keep scrolling down for the tutorial on how to make these notepads, and a photo of Nancy and Fran's elfing goodies.These notepads were so easy to make that I'll be mass assembling many of them next week to give as gifts through the Christmas season! It would be very easy to alternate designer papers too ... I have big plans to use Wintergreen DP too! The notepads in these photos use Dashing DP.SUPPLIES NEEDED AND RECIPE:
* The notepad itself is a Junior Legal Pad purchased at my local office supply store (Staples or OfficeMax). They have a copy center, and all you do is ask them to cut the pads in half vertically. My office supply store charged me $1.00 to cut the entire package of pads.
Stamps: Merry & Bright, "HOLIDAY HAPPINESS" from So Many Sayings
Paper: Real Red and Old Olive CS, Dashing DP
Ink: Jet Black Staz-On Ink Pad, Real Red & Old Olive Markers
Embellishments: Dazzling Diamonds applied on snowman's body with 2-Way Glue Pen, Button and Embroidery Floss
Tools: Paper Piercing Tool/Mat/Template, Word Window Punch, Scallop Punch, 1 1/4" and 1 3/8" Circle Punches
Supplies: Sticky Strip, Glue Dots (for button), Stampin' Dimensionals (for main image)
Note: In my examples, there is paper piercing along the Old Olive horizontal CS strip above and below the Real Red horizontal CS strip, and on each scallop of the scallop circle. Stamp the snowflake image from Merry & Bright on random pages of the notepad. I did use Pumpkin Pie marker to color in the snowman's nose, and Blush Blossom marker to give the snowman rosy cheeks.

*Cut Real Red CS base 5 1/2" x 8 1/4", score at 2 5/8" and 2 7/8".
* The outside DP panel measures 2 1/2" x 8", then cut at 5" and flipped with the opposite side of the DP on the bottom.
* The inside DP panel measures 2 1/2" x 8".
* The flap that goes around the top of the legal pad measures 1 7/8" x 2 1/2", and scored at 7/8" and 1".
* I used Sticky Strip to adhere the notepad to the cardstock.

Here are some more coordinating goodies that I sent to Nancy and Fran; an altered jumbo paper clip and altered Hershey's miniatures.
This next photo is of the completed buckets of elfing goodies with plenty of chocolate and a few stamping necessities. I've had these tins for quite sometime (thanks Leah!), and used Sticky Strip to attach the Old Olive 5/8" Grosgrain Ribbon to it. The bow is separate and adhered with Glue Dots. The hanging pendant is the same image used on the notepads, and hung from the bow with Silver Elastic Cord.
Thanks for looking! I'm slowly getting over my annual "Christmas Freak Out"! I've been completely overwhelmed with to do's in my head the last few days, but am feeling better after getting the house decorated today! woohoo! One more thing to check off the list! As Joanne Basile told me last night, and Lorri Heiling told me this morning, "BREATHE IN, BREATHE OUT!".

Tuesday, July 10, 2007

QUILT CARD TUTORIAL

This is the card I posted yesterday for the SCS Technique Lovers Challenge 124. See yesterday's post for supplies used to make this card. At the end of this post is another sample of a quilt card that I made a few months ago. For the purpose of this tutorial, I'll be using the measurements for this card photographed at the left.

cdjkssss on SCS had informed me of an easier way to do this with a Xyron machine. I don't own one of those fancy machines, so this is the primitive way!

Paper You'll Need:

* Black CS (ANY color will do, as this is your base piece and will be covered) measuring 4 1/4 x 4 1/4.

* White CS, 1 1/4" square.

* 7 different designs of DP, four strips each measuring 3/8" inch wide x 3" long or longer.

I mistakenly laid out only six different DP strips instead of 7 for this photo ... sorry!

Find the center of your Black 4 1/4 x 4 1/4 CS at 2 1/8". Draw a pencil line down the center of the Black CS in both directions.


These pencil lines will guarantee perfect centering for your White CS square. Adhere White square to the black square by lining up the points of the white square with your pencil lines.


Cover the entire black square that is still showing with adhesive. I used your basic Scotch double-stip tape (my favorite!).


Align your first strip parallel with the white square. You will have the overhang.


Adhere your second strip (same pattern as your first strip) parallel with the white square and butted up to the first strip.


Continue to adhere your second and third strip in the same manner as above.


Your second pattern selection of DP is simply adhered parallel with the first pattern, working around the white square.


... Then your third pattern selection of DP...


This photo shows what your quilt square should look like after all seven layers are adhered.


This is what the BACK of your black square should look like.


Next, trim off the excess strips of paper with a paper trimmer.


This is what your finished quilt should look like.


The possibilities are endless! .... different sizes, different DP .... Have fun!


This is another quilt card I did a few months ago, using Loves Me DP.


Tuesday, June 19, 2007

SCORING CARDSTOCK

At my very first stamp class as a Stampin' Up! Demonstrator, I demonstrated how I score CS (cardstock). It was a lightbulb moment for some of those in attendance! Although there are several ways to score CS, this is my preferred method and is the way I have always done it. It is so-o-o simple, yet provides a nice even score line and a fold without crinkles!

Supplies Needed: Paper Cutter (mine is the Fiskars brand from Stampin' Up!). It cuts paper up to 12 inches, and features easy-to-read grid lines and black base. There are scoring blades for this cutter, but I find it much easier to grab my Stampin' Up! Bone Folder rather than replacing the blades each time.

Step #1. Cut CS 5 1/2 x 11 inches.


Step #2. Line CS up to the 4 1/2 inch marking ... make sure the bottom of the CS meets up evenly with the black base of the cutter. The 4 1/2 inch marking is the halfway mark for folding the CS in half.


Step #3. There is a groove in the black blade guide of the paper cutter. This photo shows the Bone Folder pointing to the groove.


Step #4. Simply run the Bone Folder down the length of the CS, using the groove as your guide. Don't put too much pressure on your CS, as it may tear. With practice, you will be able to achieve the proper amount of pressure for a nice score line and even fold with four corners that meet when folded.