EQUIPMENT. I do not own a fancy, expensive camera. I use my Nikon Coolpix 5200 point & shoot digital camera.
WHERE. I take most of my photos at my stamping workstation ... see photo below. I wanted to point out a couple of things in this photo. First, the window with the blinds open. I have found that the more natural light I have coming in the room, without it being direct sunlight, the better. I also have fluorescent lighting under the cabinets and an OTT-LITE lamp that provides natural light.
 THE BACKDROP. This next photo zooms in closer to show you the unsophisticated "studio" I easily rig up for each photo. I use two white cardboards from Stampin' Up!'s Designer Paper Packs ... one lies flat on my work surface, and the other is used as a backdrop (it just leans against my pegboard.
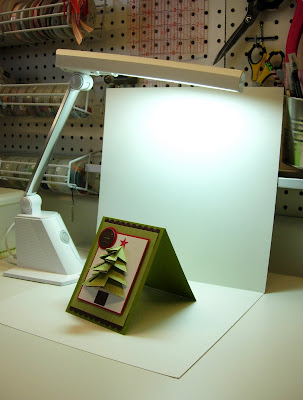 LIGHTING. I try to let as much natural light into the room as possible. The fluorescent lighting under the cabinets provides light on my artwork. My craft room has a ceiling fan & light in the center of the room. For some reason, my photos turn out better with that light off (when shooting the photo, that light would be behind & above me). I position the OTT-LITE (natural light) BEHIND my artwork, a key component. It does not shine toward the artwork, it shines directly down, behind it. I never use a flash on my camera (disaster!).
 CAMERA SETTINGS. I use a simple "Point-and-Shoot" mode and the Macro Close-Up option (tulip icon). Again, I never use a flash.
POSITIONING. I rarely photograph my artwork straight on ... I almost always angle the artwork slightly to each side. I also tend to photograph each piece with my camera slightly elevated.
PRACTICE, PRACTICE, PRACTICE. When photographing artwork I take MANY photos of it. It never fails ... I usually think a card will look great photographed from one side better than the other ... and the opposite is usually the case. So, I take many photographs from many different angles to get the best photo. Don't you just love digital for this very reason?!
EDITING. The next step is to choose the one photo from many that I think is best and edit. I use Adobe Photoshop 6.0. First I crop the photo, then play around with the lighting. I always to go ENHANCE, ADJUST LIGHTING, LEVELS. I play around with the Input Levels, and sometimes the Output Levels to get the best lighting. Sometimes, I go to ENHANCE, ADJUST LIGHTING, BRIGHTNESS/CONTRAST and adjust the lighting there too. Again, lots of trial and error.
ADD YOUR MARK. Lastly, I add a watermark as an overlay to the photo, the white lettering that says "designed by Nancy Riley". I think this is such an important step as a designer, as I've seen some artists' photos/artwork used without permission. Get a watermark to protect your beautiful artwork! I've had a couple watermarks designed by Beth Silaika, Freckled and Fun. She has lots of great designs to choose from!
As a final note, I encourage you to experiment, especially with lighting. A photograph should enhance your beautiful artwork and really show it off!
12 comments:
Thanks for the tips, Nancy! It's nice to know that one doesn't need a several hundred dollar white popup laundry holder to take photos with :-)
Thank you for the fabulous tips! I'll definitely be referring to this post often!
Awesome tips!!! I will work on a few of them when I post my next blog with my photos. I have something “rigged” in the basement with an over-head florescent light, white cloth and foam boards. I want to get an Ott-Lite, maybe my Christmas $$... He!! I really appreciate you taking the time to post this info... Smiles!! :)
Nancy,
Thanks for all the great tips! Your work always looks fantastic and your pictures are the best!
Thank you very much for the tutorial! This is pretty much what I set up today... but I used black backgound, and I had the light (also and OTT) in front. I'll definitly have to try it with white and with the light to the back.
Thank you for sharing your tips Nancy. I will give that a go...using what I have anyway. Love Beth's watermarks too:0))
I really appreciate this information. Thanks for sharing. Also your workspace is so neat and organized. It looks super!
Nancy thank you so much for sharing your photo tips it really is helpful. Have a great week and TFS.
Debbie/Phx AZ
Such a great idea to share your wonderful photo tips. I basically do the same thing except I don't have as much natural lighting as you do and I agree, I think that is the key! Your cards area always clear & crisp ... that way we can see all those little extra details you put into your work!! TFS
Thanks, Nancy! I too use the famous SU 12x12 paper, but I have my light in front, so I am going to try your suggestion of putting it behind. Your photos are excellent and a standard I'd like to live up to! And maybe an Ott light is something Santa could give me this year!
LeAnne
Thanks you so much Nancy for taking the time to explain this....I don't have a blog and have yet to photograph my work but know if I want to submit for challenges that I need to stop being so nervous and just do it. This is a great encouragement! I love you work....nice design and no clutter.
Thanks for sharing this Nancy! I've been thinking about writing up something like this myself, but now I think I'll just link to your post, since you wrote it so well! Plus, you take far better photos than I do! I shine my ott-lite on the front of the card, I will try repositioning it, hopefully it will help. I've had a lot of trouble with my photos since moving to my poorly lit stamp closet!!
Post a Comment